Custom Search

Wednesday, March 30, 2011

Next Step


 Ready for the next Round? Here it is...


What the face and ears should look like.


Plan:
    
  • To add a smile to the face.
  • To make the ears and sew on symmetrically.
  • To work from the bottom up to connect the 2 legs.


Part 2 A: The face and add ears.
 
Face: Embroider the mouth with a simple stitich across.
Smile made.


Ears: Make 2 and use skin tone yarn.
  • 1. Ch 2. 6 sc in the 2nd ch. Sl st to beginning st and bind off. [6]
  • Pin the 2 ears to each side of the head. 
  • Sew the ears on.
Ears made and pinned to head to make sure they are symmetrical.


Ears sewn on.


Part 2 B:  Shoes and legs.


Shoes: Make 2 in black yarn. 


  • 1. Ch 2.  6 sc in the 2nd ch. [6]
  • 2. 2 sc in all 6 sc. (inc) [12]
  • 3. 1 sc in the next st, 2 sc in the next sc*, repeat 5 more times. [18]
  • 4. Place marker (pm),1 sc in the next 18 sc. [18]
  • 5. 1 sc in the next 18 sc. [18]
  • 6. 1 sc in the next sc, dec in the next sc*, repeat 5 more times. [12]
  • 7. 1 sc in the next 12 sc.  Sl st to beginning st and bind off. [12]
  • 
     
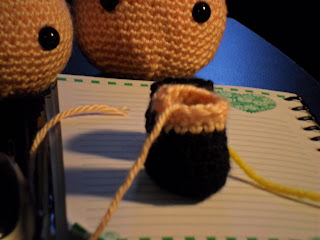
    Shoe made.
    
  • Shoe made.

  
This completes shoes...now let's add the legs. Black yarn is cut enough to weave in later.

Beginning to change colors.


Adding the leg to the shoe.


Adding more  to the leg and stuffing as you go


Legs:
  • Make 2 in flesh tone yarn.
  • Move the marker here for now.
  • The leg will be 12 sc around for 15 rows.
  •  
  •   After the 1st leg is done, cut the tail to about 1 inch to weave in later.
  • 
    15 rows completed.


  • 

  •  
    Keeping the leg stuffed as you crochet up.
    
 
Start of the second leg.


After the 2nd leg is done, do not fasten off.
  • Hold the legs together. 
  • 1 sc in the next 12 sc around of one leg and then continue to crochet the 1 sc in the 2nd leg's
  •  
  • 12 sc around. [24]
 
Once the 2nd leg is completed, start to connect the two legs.


Added a piece of black thread as a marker to show that 12 sc were done on the 1st leg.


Completed the 12 sc on the second leg.


Completed 24 sc around as the beginning of the lower trunk.


This holds the lower part of the torso and we will crochet up to the begiinning of the chest and add the colored yarn for the chest as the top of the dress.
Does this make sense?


I decided to incorporate the dress on the body when I first made them.
For those that are advanced or adventerous may continue all the way up and add a dress
later. I've done that , too.

Remember, this is your project. I just want to share my pattern and let you embellish as you
choose. That's part of the fun.


Monday, March 28, 2011

Little Pigtail Girl CAL

Little Pigtail Girl CAL
I decided to to make this project a Crochet A Long with photos.
See at the end of this session at the bottom of
the updated photos  that shows the process.
Part One: The Head
The hair will be covered later.

Supplies:
Simply Soft from Caron in Light Country Peach 
1- 3.5 mm/E hook
1 piece of different colored string or marker
1 pr of 12mm or even 15mm solid black eyes
(or black embroidery thread and needle to sew on eyes if this
project is made for  a child < 3 yrs of age.
100% Polyfill for stuffing

Gauge:
1- 6 oz./170 gm Caron Simply Soft will make almost 2 dolls.

Plan:
Using Bernat for beginners in case you need any references. Just click on Bernat.
Using single crochet (sc) with combinations of increasing sc (inc)  and decreasing sc (dec)
Inc: 2 sc in one st. Inc made.
Dec: Insert hook in first st, yarn over (yo), draw up a loop, insert hook in the next yo, draw up a loop, yo, pull through 3 loops. Dec made.
 

Quick look as we increase using a marker especially for  Steps 7-17.


Pattern:

Chain (ch) 2.
  • 1. Single crochet (sc) 7 into 2nd chain stitch (st) from the hook .[7]
  •  Project is worked in rounds, make sure to mark the beginning (or end) of each round so you don’t lose your spot.
  • Make sure your tension is tight enough so when you stuff it, no stuffing is sticking out.
    You may use the magic loop (from Crochetme forum) if you want. I personally like the other way.

  •  2. 2 sc in each 7st. . [14] (beginning to increase)
  •  3. (Sc 1, sc 2 in next st)*, now repeat * 6 more times. [21]
  •  4. (Sc 2, sc 2 in next st)*, now repeat * 6 more times. [28]
  •  5. (Sc 3, sc 2 in next st)*, now repeat * 6 more times. [35]
  •  6. (Sc 4, sc 2 in next st)*, now repeat * 6 more times. [42]
  •  Stopping the increasing and now creating the main part of the face.
  •  7-17. Sc 42 sts around for 10 rows. Use your marker or your piece of yarn to designate the first st.
Let's stop for a second...let's plan to place the eyes on this doll.
Now, we can mark with contrast yarn to place the eyes or place the
plastic eyes in the designated area without snapping the back part on (just in case you miss the position like I do sometimes and have to almost rip off...don't do that!)

See the dec st make  7 cool angles  see your eye placements


But by experience, just placing a marker to kind of placing where the eyes may go and think about how far apart you want the eyes to be placed.
Is this this critical? Yeh, it is because with amigurumi, we are looking at cuteness.  Personally, I  go between 6-8 sts apart vs some
designers going closer or further apart. It's your choice.
Some designers favor to start filling the head at this point but I found that you get that fuzz caught on the hook.
My suggestion is to do some decreasing sc rounds and then start to fill as well as look at how the eye placement appears. (This goes for embroidery or even placing black felt pieces and embroidering around the eyes)
  •  18. (Sc 4, decrease (dec) 1)*, repeat 6 more times. [35]
  •  19. (Sc 3, dec 1)*, repeat 6 more times. [28]
  •  20. (Sc 2, dec 1)*, repeat 6 more times. [21]
  •  21. (Sc 1, dec 1)*, repeat 6 more times. [14]
Believe it or not but, you may start placing the eyes  between  Step 20 or 21.

Better shaping and better eye placement.

You can see the decreasing angles and can gauge where the eyes may stay and then fill.
You can feel the shape of the head and be more confident  toward the final shaping.
  •  22. dec 7 [7] and slip stitch (sl) into the last st and pull through the loop to complete the round.
  • 
  • 23. Weave in ends. The torso will have a weaving tail to attach to the head.


Closer look at eye placement.


For now this completes the head. Next part will complete the ears and  add a smile with embroidery thread. We will start on the feet and legs, too. Until then, happy crocheting! Valis

Update for this blog.Photo review of the Head. 
Completed the inc and dec rounds with eye placement.

Eyes needs more adjustment.


Happy with the adjustment and snapped eyes on, then start to fill head.

Completing the dec rounds-Almost done!

Last 6 stitches and ready to close and shape.

Closed and will weave extra yarn inside and shape the head better.

Reshaped head. Does this all make sense? I hope it does.

Wednesday, March 23, 2011

Little Pigtail Girl

This is the little Pigtail Girl. After doing so many amigurumi projects, I believe this is the one I want to share with you. Now, at this time I have to complete some commissioned work and will be writing the pattern. Please be patient and it will be worth the wait. This is one of my proudest works and I can't wait to share with you. Until then, thanks for everyone's support. Valis

Tuesday, March 22, 2011

First day of Spring


Cowgirl Rabbit Complete
Feeling better after a brief encounter with a virus. Able to complete this Cowgirl Rabbit  for a friend's daughter for Easter. Coming soon will be her brother's cowboy rabbit. I recently made them a couple of Minions from the movie, Dispicable Me.     This is a very popular movie and now I own the DVD.                                                                                     


Monday, March 14, 2011

New Designs

El Chupacabra!
I thought making amigurumis was a fad for me, but I have had so many requests for different projects.This has been great. I feel useful for a change.
Embroidered eyes for a 2 yr old. Safety 1st!
I made a chupacabra for a doctor for a gift to his sister. It was a great challenge and absolutely a joy to make. Along with that order, I made a golden retirever and a kitty for 2 little girls.

I made an 11 inch Batgirl to follow the 16 inch Batman figure for a duo Birthday gift for a little girl and her uncle. My friend was nice to take a picture of the gift before she left for the party. I brushed the yarn for the hair and it came out silky and wavy. I did not want a yarn-ie type of hair. Had to make it a little unique.


I have been inspired with the Dispicable Me movie and had to buy it. So many people at work wanted the minions  of various shapes. But I do love the response and chuckles after they receive their order.

Pretty soon, I will be completing Easter bunnies and other cute forest animals. Looking forward to sharing all with you. For those that ordered, thank you so much for your support.

With gratitude, Valis